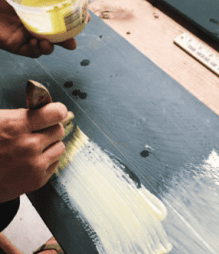
Adding glue to the sign with a brush
A new addition to our regular columnists, Sign Update asked friend of the magazine and award-winning sign writer Perry Eales of Perry Signs London to offer his advice on traditional sign making. Here is his first note, all about creating an aged look using glue.
If you’re into hand lettering or traditional sign painting, creating a convincing faux vintage finish is a skill well worth having.
Aged, weathered backgrounds can instantly add character to a piece, making it feel like an authentic relic rather than something freshly made. One of the simplest and most effective ways to achieve this look is by creating a crackle finish – and all you need is wood glue and the right paint.
As with most sign work, preparation is key. Start with a smooth panel and apply a suitable primer. This ensures good adhesion and a consistent surface to work on. Once the primer is fully dry, move on to your base coat.
For this technique, it’s important to use an exterior acrylic house paint with a gloss finish. Avoid matte, satin or even semi-gloss here, as the gloss layer helps the crackle effect develop properly.
Build the base
Choose a dark base colour to maximise contrast. Blacks, deep browns, navy blues or dark greens all work well, depending on the look you’re going for.
Apply the paint evenly and allow it to dry completely – don’t rush this stage, as any remaining moisture can interfere with the crackling process later on.
Next comes the step that makes the magic happen. Take your wood glue, and thin it slightly with water so it brushes out smoothly. You want it to be about the consistency of tomato soup. Coat theentire background quickly.
Depending on the humidity, dry heat will work quicker and better. Apply a consistent coat across the panel. The thickness of this layer will influence the final result: A heavier coat will produce larger, more dramatic cracks, while a thinner application gives a finer, more subtle texture.
Once the glue is on, you can speed things up using a heat gun or hair dryer. The goal is to partially dry the glue so that it forms a skin on the surface while remaining wet underneath.
This is the critical moment in the process. If the glue dries completely, you won’t get the crackle effect, so keep a close eye on it. When the glue has reached that slightly tacky, semi-dry stage, apply your topcoat. This should be a light-coloured matte paint to contrast with the dark base underneath.
As you brush it on, you’ll start to see the crackle effect appear almost immediately. The top layer shrinks as it dries, splitting and revealing the darker colour below. Don’t over-brush the paint or it will start to pick up the glue.
Crackling starts to occur quickly. For more crazing and cracks, I use a heat gun again. You can use a hair dryer again at this stage to accelerate the process and even influence the look.
More heat tends to encourage larger cracks, while letting it air dry can produce a slightly finer finish. Don’t be afraid to experiment – every panel will
behave a little differently. Once dry, it’s ready to letter.

The completed look
Onto the paint
Once the crackle layer is fully dry, you’ve got a great base to work on. When it comes to lettering, you can lean into the aged effect by using a dry brush in places or thinning your paint slightly so that brush strokes remain visible.
This helps avoid a ‘too perfect’ finish and adds to the authenticity. After your lettering has dried, you can take things a step further by lightly scuffing or sanding areas of the design.
Focus on edges, corners, and natural wear points to enhance the illusion of age. Subtlety is key here – it’s easy to overdo it. This is a straightforward technique, but one that delivers consistently striking results.
With a bit of practice, you can control the size and intensity of the crackle to suit your style, whether you’re aiming for a gently aged look or something more distressed and bold.
Give it a go – and don’t be surprised if it becomes a regular part of your sign painting toolkit.
LnRiLWNvbnRhaW5lciAudGItY29udGFpbmVyLWlubmVye3dpZHRoOjEwMCU7bWFyZ2luOjAgYXV0b30gLndwLWJsb2NrLXRvb2xzZXQtYmxvY2tzLWNvbnRhaW5lci50Yi1jb250YWluZXJbZGF0YS10b29sc2V0LWJsb2Nrcy1jb250YWluZXI9ImIxMGQzYTIyMTljMWE1OWFjNWExNDA4NjRlMTk2ZWNiIl0geyBiYWNrZ3JvdW5kOiByZ2JhKCAyNTUsIDI1NSwgMjU1LCAxICk7cGFkZGluZzogMjVweDtib3JkZXI6IDFweCBzb2xpZCByZ2JhKCAyMjgsIDIyMSwgMjIxLCAxICk7IH0gLnRiLWdyaWQsLnRiLWdyaWQ+LmJsb2NrLWVkaXRvci1pbm5lci1ibG9ja3M+LmJsb2NrLWVkaXRvci1ibG9jay1saXN0X19sYXlvdXR7ZGlzcGxheTpncmlkO2dyaWQtcm93LWdhcDoyNXB4O2dyaWQtY29sdW1uLWdhcDoyNXB4fS50Yi1ncmlkLWl0ZW17YmFja2dyb3VuZDojZDM4YTAzO3BhZGRpbmc6MzBweH0udGItZ3JpZC1jb2x1bW57ZmxleC13cmFwOndyYXB9LnRiLWdyaWQtY29sdW1uPip7d2lkdGg6MTAwJX0udGItZ3JpZC1jb2x1bW4udGItZ3JpZC1hbGlnbi10b3B7d2lkdGg6MTAwJTtkaXNwbGF5OmZsZXg7YWxpZ24tY29udGVudDpmbGV4LXN0YXJ0fS50Yi1ncmlkLWNvbHVtbi50Yi1ncmlkLWFsaWduLWNlbnRlcnt3aWR0aDoxMDAlO2Rpc3BsYXk6ZmxleDthbGlnbi1jb250ZW50OmNlbnRlcn0udGItZ3JpZC1jb2x1bW4udGItZ3JpZC1hbGlnbi1ib3R0b217d2lkdGg6MTAwJTtkaXNwbGF5OmZsZXg7YWxpZ24tY29udGVudDpmbGV4LWVuZH0gLndwdi12aWV3LW91dHB1dFtkYXRhLXRvb2xzZXQtdmlld3Mtdmlldy1lZGl0b3I9IjUwYTRjYzVhYzYzMThkMjg0MWY2MTJlOTQ5YzNhNTU3Il0gPiAudGItZ3JpZC1jb2x1bW46bnRoLW9mLXR5cGUoNG4gKyAxKSB7IGdyaWQtY29sdW1uOiAxIH0gLndwdi12aWV3LW91dHB1dFtkYXRhLXRvb2xzZXQtdmlld3Mtdmlldy1lZGl0b3I9IjUwYTRjYzVhYzYzMThkMjg0MWY2MTJlOTQ5YzNhNTU3Il0gPiAudGItZ3JpZC1jb2x1bW46bnRoLW9mLXR5cGUoNG4gKyAyKSB7IGdyaWQtY29sdW1uOiAyIH0gLndwdi12aWV3LW91dHB1dFtkYXRhLXRvb2xzZXQtdmlld3Mtdmlldy1lZGl0b3I9IjUwYTRjYzVhYzYzMThkMjg0MWY2MTJlOTQ5YzNhNTU3Il0gPiAudGItZ3JpZC1jb2x1bW46bnRoLW9mLXR5cGUoNG4gKyAzKSB7IGdyaWQtY29sdW1uOiAzIH0gLndwdi12aWV3LW91dHB1dFtkYXRhLXRvb2xzZXQtdmlld3Mtdmlldy1lZGl0b3I9IjUwYTRjYzVhYzYzMThkMjg0MWY2MTJlOTQ5YzNhNTU3Il0gPiAudGItZ3JpZC1jb2x1bW46bnRoLW9mLXR5cGUoNG4gKyA0KSB7IGdyaWQtY29sdW1uOiA0IH0gLndwdi12aWV3LW91dHB1dFtkYXRhLXRvb2xzZXQtdmlld3Mtdmlldy1lZGl0b3I9IjUwYTRjYzVhYzYzMThkMjg0MWY2MTJlOTQ5YzNhNTU3Il0gLmpzLXdwdi1sb29wLXdyYXBwZXIgPiAudGItZ3JpZCB7IGdyaWQtdGVtcGxhdGUtY29sdW1uczogbWlubWF4KDAsIDAuMjVmcikgbWlubWF4KDAsIDAuMjVmcikgbWlubWF4KDAsIDAuMjVmcikgbWlubWF4KDAsIDAuMjVmcik7Z3JpZC1hdXRvLWZsb3c6IHJvdyB9ICAgLnRiLWNvbnRhaW5lciAudGItY29udGFpbmVyLWlubmVye3dpZHRoOjEwMCU7bWFyZ2luOjAgYXV0b30gLndwLWJsb2NrLXRvb2xzZXQtYmxvY2tzLWNvbnRhaW5lci50Yi1jb250YWluZXJbZGF0YS10b29sc2V0LWJsb2Nrcy1jb250YWluZXI9IjM4ODljNzZhOWZkZTk1NWYxNGJkNmM5Yzk3MzllZmI2Il0geyBiYWNrZ3JvdW5kOiB1cmwoJ2h0dHBzOi8vc2lnbnVwZGF0ZS5jby51ay93cC1jb250ZW50L3VwbG9hZHMvMjAyNC8xMC9zcXVlZWdlZTEuanBnJykgY2VudGVyIGNlbnRlciBuby1yZXBlYXQ7YmFja2dyb3VuZC1zaXplOmNvdmVyO3BhZGRpbmc6IDI1cHg7bWFyZ2luLWJvdHRvbTogMTBweDttaW4taGVpZ2h0OiAxMDBweDsgfSAudGItY29udGFpbmVyIC50Yi1jb250YWluZXItaW5uZXJ7d2lkdGg6MTAwJTttYXJnaW46MCBhdXRvfSAud3AtYmxvY2stdG9vbHNldC1ibG9ja3MtY29udGFpbmVyLnRiLWNvbnRhaW5lcltkYXRhLXRvb2xzZXQtYmxvY2tzLWNvbnRhaW5lcj0iYjVhMmExZjA4ZDE2MjcwNzVlNTNjZDcyYjY2MTVhNTMiXSB7IHBhZGRpbmc6IDI1cHggMHB4IDI1cHggMHB4OyB9IC50Yi1ncmlkLC50Yi1ncmlkPi5ibG9jay1lZGl0b3ItaW5uZXItYmxvY2tzPi5ibG9jay1lZGl0b3ItYmxvY2stbGlzdF9fbGF5b3V0e2Rpc3BsYXk6Z3JpZDtncmlkLXJvdy1nYXA6MjVweDtncmlkLWNvbHVtbi1nYXA6MjVweH0udGItZ3JpZC1pdGVte2JhY2tncm91bmQ6I2QzOGEwMztwYWRkaW5nOjMwcHh9LnRiLWdyaWQtY29sdW1ue2ZsZXgtd3JhcDp3cmFwfS50Yi1ncmlkLWNvbHVtbj4qe3dpZHRoOjEwMCV9LnRiLWdyaWQtY29sdW1uLnRiLWdyaWQtYWxpZ24tdG9we3dpZHRoOjEwMCU7ZGlzcGxheTpmbGV4O2FsaWduLWNvbnRlbnQ6ZmxleC1zdGFydH0udGItZ3JpZC1jb2x1bW4udGItZ3JpZC1hbGlnbi1jZW50ZXJ7d2lkdGg6MTAwJTtkaXNwbGF5OmZsZXg7YWxpZ24tY29udGVudDpjZW50ZXJ9LnRiLWdyaWQtY29sdW1uLnRiLWdyaWQtYWxpZ24tYm90dG9te3dpZHRoOjEwMCU7ZGlzcGxheTpmbGV4O2FsaWduLWNvbnRlbnQ6ZmxleC1lbmR9IC53cC1ibG9jay10b29sc2V0LWJsb2Nrcy1ncmlkLnRiLWdyaWRbZGF0YS10b29sc2V0LWJsb2Nrcy1ncmlkPSIzZDljMzk5ZmU2MjVlMWI5NzJmODE3YTA2ODAyMjlmNiJdIHsgZ3JpZC10ZW1wbGF0ZS1jb2x1bW5zOiBtaW5tYXgoMCwgMC41ZnIpIG1pbm1heCgwLCAwLjVmcik7Z3JpZC1hdXRvLWZsb3c6IHJvdyB9IC53cC1ibG9jay10b29sc2V0LWJsb2Nrcy1ncmlkLnRiLWdyaWRbZGF0YS10b29sc2V0LWJsb2Nrcy1ncmlkPSIzZDljMzk5ZmU2MjVlMWI5NzJmODE3YTA2ODAyMjlmNiJdID4gLnRiLWdyaWQtY29sdW1uOm50aC1vZi10eXBlKDJuICsgMSkgeyBncmlkLWNvbHVtbjogMSB9IC53cC1ibG9jay10b29sc2V0LWJsb2Nrcy1ncmlkLnRiLWdyaWRbZGF0YS10b29sc2V0LWJsb2Nrcy1ncmlkPSIzZDljMzk5ZmU2MjVlMWI5NzJmODE3YTA2ODAyMjlmNiJdID4gLnRiLWdyaWQtY29sdW1uOm50aC1vZi10eXBlKDJuICsgMikgeyBncmlkLWNvbHVtbjogMiB9IC53cC1ibG9jay10b29sc2V0LWJsb2Nrcy1ncmlkLWNvbHVtbi50Yi1ncmlkLWNvbHVtbltkYXRhLXRvb2xzZXQtYmxvY2tzLWdyaWQtY29sdW1uPSJlODYzZDY2ZWFjOTQ5OTA4YTVjNmM4ZDJmZDMxMzIwYyJdIHsgZGlzcGxheTogZmxleDsgfSAudGItc29jaWFsLXNoYXJlX19uZXR3b3Jre2Rpc3BsYXk6aW5saW5lLWJsb2NrO3RleHQtYWxpZ246Y2VudGVyO3ZlcnRpY2FsLWFsaWduOnRvcDttYXJnaW4tcmlnaHQ6N3B4O21hcmdpbi1ib3R0b206N3B4fS50Yi1zb2NpYWwtc2hhcmUtLTA5MiAudGItc29jaWFsLXNoYXJlX19mYWNlYm9va19fc2hhcmUtYnV0dG9ue2N1cnNvcjpwb2ludGVyO2Rpc3BsYXk6aW5saW5lLWJsb2NrO2JhY2tncm91bmQtc2l6ZTpjb250YWluO2JhY2tncm91bmQtY29sb3I6IzNiNTk5ODt9LnRiLXNvY2lhbC1zaGFyZS0tMDkyIC50Yi1zb2NpYWwtc2hhcmVfX2xpbmtlZGluX19zaGFyZS1idXR0b257Y3Vyc29yOnBvaW50ZXI7ZGlzcGxheTppbmxpbmUtYmxvY2s7YmFja2dyb3VuZC1zaXplOmNvbnRhaW47YmFja2dyb3VuZC1jb2xvcjojMDA3ZmIxO30udGItc29jaWFsLXNoYXJlLS0wOTIgLnRiLXNvY2lhbC1zaGFyZV9fdHdpdHRlcl9fc2hhcmUtYnV0dG9ue2N1cnNvcjpwb2ludGVyO2Rpc3BsYXk6aW5saW5lLWJsb2NrO2JhY2tncm91bmQtc2l6ZTpjb250YWluO2JhY2tncm91bmQtY29sb3I6IzAwMDt9LnRiLXNvY2lhbC1zaGFyZS0tMDkyIC50Yi1zb2NpYWwtc2hhcmVfX3BpbnRlcmVzdF9fc2hhcmUtYnV0dG9ue2N1cnNvcjpwb2ludGVyO2Rpc3BsYXk6aW5saW5lLWJsb2NrO2JhY2tncm91bmQtc2l6ZTpjb250YWluO2JhY2tncm91bmQtY29sb3I6I2NiMjEyODt9LnRiLXNvY2lhbC1zaGFyZS0tMDkyIC50Yi1zb2NpYWwtc2hhcmVfX3RlbGVncmFtX19zaGFyZS1idXR0b257Y3Vyc29yOnBvaW50ZXI7ZGlzcGxheTppbmxpbmUtYmxvY2s7YmFja2dyb3VuZC1zaXplOmNvbnRhaW47YmFja2dyb3VuZC1jb2xvcjojMzdhZWUyO30udGItc29jaWFsLXNoYXJlLS0wOTIgLnRiLXNvY2lhbC1zaGFyZV9fcmVkZGl0X19zaGFyZS1idXR0b257Y3Vyc29yOnBvaW50ZXI7ZGlzcGxheTppbmxpbmUtYmxvY2s7YmFja2dyb3VuZC1zaXplOmNvbnRhaW47YmFja2dyb3VuZC1jb2xvcjojNWY5OWNmO30udGItc29jaWFsLXNoYXJlLS0wOTIgLnRiLXNvY2lhbC1zaGFyZV9fdmliZXJfX3NoYXJlLWJ1dHRvbntjdXJzb3I6cG9pbnRlcjtkaXNwbGF5OmlubGluZS1ibG9jaztiYWNrZ3JvdW5kLXNpemU6Y29udGFpbjtiYWNrZ3JvdW5kLWNvbG9yOiM3YzUyOWU7fS50Yi1zb2NpYWwtc2hhcmUtLTA5MiAudGItc29jaWFsLXNoYXJlX193aGF0c2FwcF9fc2hhcmUtYnV0dG9ue2N1cnNvcjpwb2ludGVyO2Rpc3BsYXk6aW5saW5lLWJsb2NrO2JhY2tncm91bmQtc2l6ZTpjb250YWluO2JhY2tncm91bmQtY29sb3I6IzI1ZDM2Njt9LnRiLXNvY2lhbC1zaGFyZS0tMDkyIC50Yi1zb2NpYWwtc2hhcmVfX2VtYWlsX19zaGFyZS1idXR0b257Y3Vyc29yOnBvaW50ZXI7ZGlzcGxheTppbmxpbmUtYmxvY2s7YmFja2dyb3VuZC1zaXplOmNvbnRhaW47YmFja2dyb3VuZC1jb2xvcjojN2Y3ZjdmO30udGItc29jaWFsLXNoYXJlLS1yb3VuZCAuU29jaWFsTWVkaWFTaGFyZUJ1dHRvbntib3JkZXItcmFkaXVzOjUwJX0udGItc29jaWFsLXNoYXJlX19leGNlcnB0e2Rpc3BsYXk6bm9uZX0udGItc29jaWFsLXNoYXJlIC5Tb2NpYWxNZWRpYVNoYXJlQnV0dG9uLS1kaXNhYmxlZHtvcGFjaXR5OjAuNjV9IC50Yi1zb2NpYWwtc2hhcmVbZGF0YS10b29sc2V0LWJsb2Nrcy1zb2NpYWwtc2hhcmU9IjZjNDAxMjI1ZDBjYTM3NTcyOTM5N2Q2MWIxOTI5OTlmIl0gLlNvY2lhbE1lZGlhU2hhcmVCdXR0b24geyB3aWR0aDogMzJweDtoZWlnaHQ6IDMycHg7IH0gQG1lZGlhIG9ubHkgc2NyZWVuIGFuZCAobWF4LXdpZHRoOiA3ODFweCkgeyAudGItY29udGFpbmVyIC50Yi1jb250YWluZXItaW5uZXJ7d2lkdGg6MTAwJTttYXJnaW46MCBhdXRvfS50Yi1ncmlkLC50Yi1ncmlkPi5ibG9jay1lZGl0b3ItaW5uZXItYmxvY2tzPi5ibG9jay1lZGl0b3ItYmxvY2stbGlzdF9fbGF5b3V0e2Rpc3BsYXk6Z3JpZDtncmlkLXJvdy1nYXA6MjVweDtncmlkLWNvbHVtbi1nYXA6MjVweH0udGItZ3JpZC1pdGVte2JhY2tncm91bmQ6I2QzOGEwMztwYWRkaW5nOjMwcHh9LnRiLWdyaWQtY29sdW1ue2ZsZXgtd3JhcDp3cmFwfS50Yi1ncmlkLWNvbHVtbj4qe3dpZHRoOjEwMCV9LnRiLWdyaWQtY29sdW1uLnRiLWdyaWQtYWxpZ24tdG9we3dpZHRoOjEwMCU7ZGlzcGxheTpmbGV4O2FsaWduLWNvbnRlbnQ6ZmxleC1zdGFydH0udGItZ3JpZC1jb2x1bW4udGItZ3JpZC1hbGlnbi1jZW50ZXJ7d2lkdGg6MTAwJTtkaXNwbGF5OmZsZXg7YWxpZ24tY29udGVudDpjZW50ZXJ9LnRiLWdyaWQtY29sdW1uLnRiLWdyaWQtYWxpZ24tYm90dG9te3dpZHRoOjEwMCU7ZGlzcGxheTpmbGV4O2FsaWduLWNvbnRlbnQ6ZmxleC1lbmR9IC53cHYtdmlldy1vdXRwdXRbZGF0YS10b29sc2V0LXZpZXdzLXZpZXctZWRpdG9yPSI1MGE0Y2M1YWM2MzE4ZDI4NDFmNjEyZTk0OWMzYTU1NyJdID4gLnRiLWdyaWQtY29sdW1uOm50aC1vZi10eXBlKDNuICsgMSkgeyBncmlkLWNvbHVtbjogMSB9IC53cHYtdmlldy1vdXRwdXRbZGF0YS10b29sc2V0LXZpZXdzLXZpZXctZWRpdG9yPSI1MGE0Y2M1YWM2MzE4ZDI4NDFmNjEyZTk0OWMzYTU1NyJdID4gLnRiLWdyaWQtY29sdW1uOm50aC1vZi10eXBlKDNuICsgMikgeyBncmlkLWNvbHVtbjogMiB9IC53cHYtdmlldy1vdXRwdXRbZGF0YS10b29sc2V0LXZpZXdzLXZpZXctZWRpdG9yPSI1MGE0Y2M1YWM2MzE4ZDI4NDFmNjEyZTk0OWMzYTU1NyJdID4gLnRiLWdyaWQtY29sdW1uOm50aC1vZi10eXBlKDNuICsgMykgeyBncmlkLWNvbHVtbjogMyB9IC53cHYtdmlldy1vdXRwdXRbZGF0YS10b29sc2V0LXZpZXdzLXZpZXctZWRpdG9yPSI1MGE0Y2M1YWM2MzE4ZDI4NDFmNjEyZTk0OWMzYTU1NyJdIC5qcy13cHYtbG9vcC13cmFwcGVyID4gLnRiLWdyaWQgeyBncmlkLXRlbXBsYXRlLWNvbHVtbnM6IG1pbm1heCgwLCAwLjMzMzNmcikgbWlubWF4KDAsIDAuMzMzM2ZyKSBtaW5tYXgoMCwgMC4zMzMzZnIpO2dyaWQtYXV0by1mbG93OiByb3cgfSAgIC50Yi1jb250YWluZXIgLnRiLWNvbnRhaW5lci1pbm5lcnt3aWR0aDoxMDAlO21hcmdpbjowIGF1dG99LnRiLWNvbnRhaW5lciAudGItY29udGFpbmVyLWlubmVye3dpZHRoOjEwMCU7bWFyZ2luOjAgYXV0b30udGItZ3JpZCwudGItZ3JpZD4uYmxvY2stZWRpdG9yLWlubmVyLWJsb2Nrcz4uYmxvY2stZWRpdG9yLWJsb2NrLWxpc3RfX2xheW91dHtkaXNwbGF5OmdyaWQ7Z3JpZC1yb3ctZ2FwOjI1cHg7Z3JpZC1jb2x1bW4tZ2FwOjI1cHh9LnRiLWdyaWQtaXRlbXtiYWNrZ3JvdW5kOiNkMzhhMDM7cGFkZGluZzozMHB4fS50Yi1ncmlkLWNvbHVtbntmbGV4LXdyYXA6d3JhcH0udGItZ3JpZC1jb2x1bW4+Knt3aWR0aDoxMDAlfS50Yi1ncmlkLWNvbHVtbi50Yi1ncmlkLWFsaWduLXRvcHt3aWR0aDoxMDAlO2Rpc3BsYXk6ZmxleDthbGlnbi1jb250ZW50OmZsZXgtc3RhcnR9LnRiLWdyaWQtY29sdW1uLnRiLWdyaWQtYWxpZ24tY2VudGVye3dpZHRoOjEwMCU7ZGlzcGxheTpmbGV4O2FsaWduLWNvbnRlbnQ6Y2VudGVyfS50Yi1ncmlkLWNvbHVtbi50Yi1ncmlkLWFsaWduLWJvdHRvbXt3aWR0aDoxMDAlO2Rpc3BsYXk6ZmxleDthbGlnbi1jb250ZW50OmZsZXgtZW5kfSAud3AtYmxvY2stdG9vbHNldC1ibG9ja3MtZ3JpZC50Yi1ncmlkW2RhdGEtdG9vbHNldC1ibG9ja3MtZ3JpZD0iM2Q5YzM5OWZlNjI1ZTFiOTcyZjgxN2EwNjgwMjI5ZjYiXSB7IGdyaWQtdGVtcGxhdGUtY29sdW1uczogbWlubWF4KDAsIDAuNWZyKSBtaW5tYXgoMCwgMC41ZnIpO2dyaWQtYXV0by1mbG93OiByb3cgfSAud3AtYmxvY2stdG9vbHNldC1ibG9ja3MtZ3JpZC50Yi1ncmlkW2RhdGEtdG9vbHNldC1ibG9ja3MtZ3JpZD0iM2Q5YzM5OWZlNjI1ZTFiOTcyZjgxN2EwNjgwMjI5ZjYiXSA+IC50Yi1ncmlkLWNvbHVtbjpudGgtb2YtdHlwZSgybiArIDEpIHsgZ3JpZC1jb2x1bW46IDEgfSAud3AtYmxvY2stdG9vbHNldC1ibG9ja3MtZ3JpZC50Yi1ncmlkW2RhdGEtdG9vbHNldC1ibG9ja3MtZ3JpZD0iM2Q5YzM5OWZlNjI1ZTFiOTcyZjgxN2EwNjgwMjI5ZjYiXSA+IC50Yi1ncmlkLWNvbHVtbjpudGgtb2YtdHlwZSgybiArIDIpIHsgZ3JpZC1jb2x1bW46IDIgfSAud3AtYmxvY2stdG9vbHNldC1ibG9ja3MtZ3JpZC1jb2x1bW4udGItZ3JpZC1jb2x1bW5bZGF0YS10b29sc2V0LWJsb2Nrcy1ncmlkLWNvbHVtbj0iZTg2M2Q2NmVhYzk0OTkwOGE1YzZjOGQyZmQzMTMyMGMiXSB7IGRpc3BsYXk6IGZsZXg7IH0gLnRiLXNvY2lhbC1zaGFyZV9fbmV0d29ya3tkaXNwbGF5OmlubGluZS1ibG9jazt0ZXh0LWFsaWduOmNlbnRlcjt2ZXJ0aWNhbC1hbGlnbjp0b3A7bWFyZ2luLXJpZ2h0OjdweDttYXJnaW4tYm90dG9tOjdweH0udGItc29jaWFsLXNoYXJlLS0wOTIgLnRiLXNvY2lhbC1zaGFyZV9fZmFjZWJvb2tfX3NoYXJlLWJ1dHRvbntjdXJzb3I6cG9pbnRlcjtkaXNwbGF5OmlubGluZS1ibG9jaztiYWNrZ3JvdW5kLXNpemU6Y29udGFpbjtiYWNrZ3JvdW5kLWNvbG9yOiMzYjU5OTg7fS50Yi1zb2NpYWwtc2hhcmUtLTA5MiAudGItc29jaWFsLXNoYXJlX19saW5rZWRpbl9fc2hhcmUtYnV0dG9ue2N1cnNvcjpwb2ludGVyO2Rpc3BsYXk6aW5saW5lLWJsb2NrO2JhY2tncm91bmQtc2l6ZTpjb250YWluO2JhY2tncm91bmQtY29sb3I6IzAwN2ZiMTt9LnRiLXNvY2lhbC1zaGFyZS0tMDkyIC50Yi1zb2NpYWwtc2hhcmVfX3R3aXR0ZXJfX3NoYXJlLWJ1dHRvbntjdXJzb3I6cG9pbnRlcjtkaXNwbGF5OmlubGluZS1ibG9jaztiYWNrZ3JvdW5kLXNpemU6Y29udGFpbjtiYWNrZ3JvdW5kLWNvbG9yOiMwMDA7fS50Yi1zb2NpYWwtc2hhcmUtLTA5MiAudGItc29jaWFsLXNoYXJlX19waW50ZXJlc3RfX3NoYXJlLWJ1dHRvbntjdXJzb3I6cG9pbnRlcjtkaXNwbGF5OmlubGluZS1ibG9jaztiYWNrZ3JvdW5kLXNpemU6Y29udGFpbjtiYWNrZ3JvdW5kLWNvbG9yOiNjYjIxMjg7fS50Yi1zb2NpYWwtc2hhcmUtLTA5MiAudGItc29jaWFsLXNoYXJlX190ZWxlZ3JhbV9fc2hhcmUtYnV0dG9ue2N1cnNvcjpwb2ludGVyO2Rpc3BsYXk6aW5saW5lLWJsb2NrO2JhY2tncm91bmQtc2l6ZTpjb250YWluO2JhY2tncm91bmQtY29sb3I6IzM3YWVlMjt9LnRiLXNvY2lhbC1zaGFyZS0tMDkyIC50Yi1zb2NpYWwtc2hhcmVfX3JlZGRpdF9fc2hhcmUtYnV0dG9ue2N1cnNvcjpwb2ludGVyO2Rpc3BsYXk6aW5saW5lLWJsb2NrO2JhY2tncm91bmQtc2l6ZTpjb250YWluO2JhY2tncm91bmQtY29sb3I6IzVmOTljZjt9LnRiLXNvY2lhbC1zaGFyZS0tMDkyIC50Yi1zb2NpYWwtc2hhcmVfX3ZpYmVyX19zaGFyZS1idXR0b257Y3Vyc29yOnBvaW50ZXI7ZGlzcGxheTppbmxpbmUtYmxvY2s7YmFja2dyb3VuZC1zaXplOmNvbnRhaW47YmFja2dyb3VuZC1jb2xvcjojN2M1MjllO30udGItc29jaWFsLXNoYXJlLS0wOTIgLnRiLXNvY2lhbC1zaGFyZV9fd2hhdHNhcHBfX3NoYXJlLWJ1dHRvbntjdXJzb3I6cG9pbnRlcjtkaXNwbGF5OmlubGluZS1ibG9jaztiYWNrZ3JvdW5kLXNpemU6Y29udGFpbjtiYWNrZ3JvdW5kLWNvbG9yOiMyNWQzNjY7fS50Yi1zb2NpYWwtc2hhcmUtLTA5MiAudGItc29jaWFsLXNoYXJlX19lbWFpbF9fc2hhcmUtYnV0dG9ue2N1cnNvcjpwb2ludGVyO2Rpc3BsYXk6aW5saW5lLWJsb2NrO2JhY2tncm91bmQtc2l6ZTpjb250YWluO2JhY2tncm91bmQtY29sb3I6IzdmN2Y3Zjt9LnRiLXNvY2lhbC1zaGFyZS0tcm91bmQgLlNvY2lhbE1lZGlhU2hhcmVCdXR0b257Ym9yZGVyLXJhZGl1czo1MCV9LnRiLXNvY2lhbC1zaGFyZV9fZXhjZXJwdHtkaXNwbGF5Om5vbmV9LnRiLXNvY2lhbC1zaGFyZSAuU29jaWFsTWVkaWFTaGFyZUJ1dHRvbi0tZGlzYWJsZWR7b3BhY2l0eTowLjY1fSB9IEBtZWRpYSBvbmx5IHNjcmVlbiBhbmQgKG1heC13aWR0aDogNTk5cHgpIHsgLnRiLWNvbnRhaW5lciAudGItY29udGFpbmVyLWlubmVye3dpZHRoOjEwMCU7bWFyZ2luOjAgYXV0b30udGItZ3JpZCwudGItZ3JpZD4uYmxvY2stZWRpdG9yLWlubmVyLWJsb2Nrcz4uYmxvY2stZWRpdG9yLWJsb2NrLWxpc3RfX2xheW91dHtkaXNwbGF5OmdyaWQ7Z3JpZC1yb3ctZ2FwOjI1cHg7Z3JpZC1jb2x1bW4tZ2FwOjI1cHh9LnRiLWdyaWQtaXRlbXtiYWNrZ3JvdW5kOiNkMzhhMDM7cGFkZGluZzozMHB4fS50Yi1ncmlkLWNvbHVtbntmbGV4LXdyYXA6d3JhcH0udGItZ3JpZC1jb2x1bW4+Knt3aWR0aDoxMDAlfS50Yi1ncmlkLWNvbHVtbi50Yi1ncmlkLWFsaWduLXRvcHt3aWR0aDoxMDAlO2Rpc3BsYXk6ZmxleDthbGlnbi1jb250ZW50OmZsZXgtc3RhcnR9LnRiLWdyaWQtY29sdW1uLnRiLWdyaWQtYWxpZ24tY2VudGVye3dpZHRoOjEwMCU7ZGlzcGxheTpmbGV4O2FsaWduLWNvbnRlbnQ6Y2VudGVyfS50Yi1ncmlkLWNvbHVtbi50Yi1ncmlkLWFsaWduLWJvdHRvbXt3aWR0aDoxMDAlO2Rpc3BsYXk6ZmxleDthbGlnbi1jb250ZW50OmZsZXgtZW5kfSAud3B2LXZpZXctb3V0cHV0W2RhdGEtdG9vbHNldC12aWV3cy12aWV3LWVkaXRvcj0iNTBhNGNjNWFjNjMxOGQyODQxZjYxMmU5NDljM2E1NTciXSAgPiAudGItZ3JpZC1jb2x1bW46bnRoLW9mLXR5cGUoMW4rMSkgeyBncmlkLWNvbHVtbjogMSB9IC53cHYtdmlldy1vdXRwdXRbZGF0YS10b29sc2V0LXZpZXdzLXZpZXctZWRpdG9yPSI1MGE0Y2M1YWM2MzE4ZDI4NDFmNjEyZTk0OWMzYTU1NyJdIC5qcy13cHYtbG9vcC13cmFwcGVyID4gLnRiLWdyaWQgeyBncmlkLXRlbXBsYXRlLWNvbHVtbnM6IG1pbm1heCgwLCAxZnIpO2dyaWQtYXV0by1mbG93OiByb3cgfSAgIC50Yi1jb250YWluZXIgLnRiLWNvbnRhaW5lci1pbm5lcnt3aWR0aDoxMDAlO21hcmdpbjowIGF1dG99LnRiLWNvbnRhaW5lciAudGItY29udGFpbmVyLWlubmVye3dpZHRoOjEwMCU7bWFyZ2luOjAgYXV0b30udGItZ3JpZCwudGItZ3JpZD4uYmxvY2stZWRpdG9yLWlubmVyLWJsb2Nrcz4uYmxvY2stZWRpdG9yLWJsb2NrLWxpc3RfX2xheW91dHtkaXNwbGF5OmdyaWQ7Z3JpZC1yb3ctZ2FwOjI1cHg7Z3JpZC1jb2x1bW4tZ2FwOjI1cHh9LnRiLWdyaWQtaXRlbXtiYWNrZ3JvdW5kOiNkMzhhMDM7cGFkZGluZzozMHB4fS50Yi1ncmlkLWNvbHVtbntmbGV4LXdyYXA6d3JhcH0udGItZ3JpZC1jb2x1bW4+Knt3aWR0aDoxMDAlfS50Yi1ncmlkLWNvbHVtbi50Yi1ncmlkLWFsaWduLXRvcHt3aWR0aDoxMDAlO2Rpc3BsYXk6ZmxleDthbGlnbi1jb250ZW50OmZsZXgtc3RhcnR9LnRiLWdyaWQtY29sdW1uLnRiLWdyaWQtYWxpZ24tY2VudGVye3dpZHRoOjEwMCU7ZGlzcGxheTpmbGV4O2FsaWduLWNvbnRlbnQ6Y2VudGVyfS50Yi1ncmlkLWNvbHVtbi50Yi1ncmlkLWFsaWduLWJvdHRvbXt3aWR0aDoxMDAlO2Rpc3BsYXk6ZmxleDthbGlnbi1jb250ZW50OmZsZXgtZW5kfSAud3AtYmxvY2stdG9vbHNldC1ibG9ja3MtZ3JpZC50Yi1ncmlkW2RhdGEtdG9vbHNldC1ibG9ja3MtZ3JpZD0iM2Q5YzM5OWZlNjI1ZTFiOTcyZjgxN2EwNjgwMjI5ZjYiXSB7IGdyaWQtdGVtcGxhdGUtY29sdW1uczogbWlubWF4KDAsIDFmcik7Z3JpZC1hdXRvLWZsb3c6IHJvdyB9IC53cC1ibG9jay10b29sc2V0LWJsb2Nrcy1ncmlkLnRiLWdyaWRbZGF0YS10b29sc2V0LWJsb2Nrcy1ncmlkPSIzZDljMzk5ZmU2MjVlMWI5NzJmODE3YTA2ODAyMjlmNiJdICA+IC50Yi1ncmlkLWNvbHVtbjpudGgtb2YtdHlwZSgxbisxKSB7IGdyaWQtY29sdW1uOiAxIH0gLndwLWJsb2NrLXRvb2xzZXQtYmxvY2tzLWdyaWQtY29sdW1uLnRiLWdyaWQtY29sdW1uW2RhdGEtdG9vbHNldC1ibG9ja3MtZ3JpZC1jb2x1bW49ImU4NjNkNjZlYWM5NDk5MDhhNWM2YzhkMmZkMzEzMjBjIl0geyBkaXNwbGF5OiBmbGV4OyB9IC50Yi1zb2NpYWwtc2hhcmVfX25ldHdvcmt7ZGlzcGxheTppbmxpbmUtYmxvY2s7dGV4dC1hbGlnbjpjZW50ZXI7dmVydGljYWwtYWxpZ246dG9wO21hcmdpbi1yaWdodDo3cHg7bWFyZ2luLWJvdHRvbTo3cHh9LnRiLXNvY2lhbC1zaGFyZS0tMDkyIC50Yi1zb2NpYWwtc2hhcmVfX2ZhY2Vib29rX19zaGFyZS1idXR0b257Y3Vyc29yOnBvaW50ZXI7ZGlzcGxheTppbmxpbmUtYmxvY2s7YmFja2dyb3VuZC1zaXplOmNvbnRhaW47YmFja2dyb3VuZC1jb2xvcjojM2I1OTk4O30udGItc29jaWFsLXNoYXJlLS0wOTIgLnRiLXNvY2lhbC1zaGFyZV9fbGlua2VkaW5fX3NoYXJlLWJ1dHRvbntjdXJzb3I6cG9pbnRlcjtkaXNwbGF5OmlubGluZS1ibG9jaztiYWNrZ3JvdW5kLXNpemU6Y29udGFpbjtiYWNrZ3JvdW5kLWNvbG9yOiMwMDdmYjE7fS50Yi1zb2NpYWwtc2hhcmUtLTA5MiAudGItc29jaWFsLXNoYXJlX190d2l0dGVyX19zaGFyZS1idXR0b257Y3Vyc29yOnBvaW50ZXI7ZGlzcGxheTppbmxpbmUtYmxvY2s7YmFja2dyb3VuZC1zaXplOmNvbnRhaW47YmFja2dyb3VuZC1jb2xvcjojMDAwO30udGItc29jaWFsLXNoYXJlLS0wOTIgLnRiLXNvY2lhbC1zaGFyZV9fcGludGVyZXN0X19zaGFyZS1idXR0b257Y3Vyc29yOnBvaW50ZXI7ZGlzcGxheTppbmxpbmUtYmxvY2s7YmFja2dyb3VuZC1zaXplOmNvbnRhaW47YmFja2dyb3VuZC1jb2xvcjojY2IyMTI4O30udGItc29jaWFsLXNoYXJlLS0wOTIgLnRiLXNvY2lhbC1zaGFyZV9fdGVsZWdyYW1fX3NoYXJlLWJ1dHRvbntjdXJzb3I6cG9pbnRlcjtkaXNwbGF5OmlubGluZS1ibG9jaztiYWNrZ3JvdW5kLXNpemU6Y29udGFpbjtiYWNrZ3JvdW5kLWNvbG9yOiMzN2FlZTI7fS50Yi1zb2NpYWwtc2hhcmUtLTA5MiAudGItc29jaWFsLXNoYXJlX19yZWRkaXRfX3NoYXJlLWJ1dHRvbntjdXJzb3I6cG9pbnRlcjtkaXNwbGF5OmlubGluZS1ibG9jaztiYWNrZ3JvdW5kLXNpemU6Y29udGFpbjtiYWNrZ3JvdW5kLWNvbG9yOiM1Zjk5Y2Y7fS50Yi1zb2NpYWwtc2hhcmUtLTA5MiAudGItc29jaWFsLXNoYXJlX192aWJlcl9fc2hhcmUtYnV0dG9ue2N1cnNvcjpwb2ludGVyO2Rpc3BsYXk6aW5saW5lLWJsb2NrO2JhY2tncm91bmQtc2l6ZTpjb250YWluO2JhY2tncm91bmQtY29sb3I6IzdjNTI5ZTt9LnRiLXNvY2lhbC1zaGFyZS0tMDkyIC50Yi1zb2NpYWwtc2hhcmVfX3doYXRzYXBwX19zaGFyZS1idXR0b257Y3Vyc29yOnBvaW50ZXI7ZGlzcGxheTppbmxpbmUtYmxvY2s7YmFja2dyb3VuZC1zaXplOmNvbnRhaW47YmFja2dyb3VuZC1jb2xvcjojMjVkMzY2O30udGItc29jaWFsLXNoYXJlLS0wOTIgLnRiLXNvY2lhbC1zaGFyZV9fZW1haWxfX3NoYXJlLWJ1dHRvbntjdXJzb3I6cG9pbnRlcjtkaXNwbGF5OmlubGluZS1ibG9jaztiYWNrZ3JvdW5kLXNpemU6Y29udGFpbjtiYWNrZ3JvdW5kLWNvbG9yOiM3ZjdmN2Y7fS50Yi1zb2NpYWwtc2hhcmUtLXJvdW5kIC5Tb2NpYWxNZWRpYVNoYXJlQnV0dG9ue2JvcmRlci1yYWRpdXM6NTAlfS50Yi1zb2NpYWwtc2hhcmVfX2V4Y2VycHR7ZGlzcGxheTpub25lfS50Yi1zb2NpYWwtc2hhcmUgLlNvY2lhbE1lZGlhU2hhcmVCdXR0b24tLWRpc2FibGVke29wYWNpdHk6MC42NX0gfSA=
LnRiLWhlYWRpbmcuaGFzLWJhY2tncm91bmR7cGFkZGluZzowfQ==
LnRiLWZpZWxke21hcmdpbi1ib3R0b206MC43NmVtfS50Yi1maWVsZC0tbGVmdHt0ZXh0LWFsaWduOmxlZnR9LnRiLWZpZWxkLS1jZW50ZXJ7dGV4dC1hbGlnbjpjZW50ZXJ9LnRiLWZpZWxkLS1yaWdodHt0ZXh0LWFsaWduOnJpZ2h0fS50Yi1maWVsZF9fc2t5cGVfcHJldmlld3twYWRkaW5nOjEwcHggMjBweDtib3JkZXItcmFkaXVzOjNweDtjb2xvcjojZmZmO2JhY2tncm91bmQ6IzAwYWZlZTtkaXNwbGF5OmlubGluZS1ibG9ja311bC5nbGlkZV9fc2xpZGVze21hcmdpbjowfQ==